Headlight Restoration Kits 2026: UV Sealant or It Hazes Again
Polish-only headlight restoration kits haze again in months. We compare the best headlight restoration kits of 2026 by UV sealant type, durability, and effort.
Reader-supported: we may earn a commission from links on this page, at no extra cost to you. It never affects our picks. Learn more.
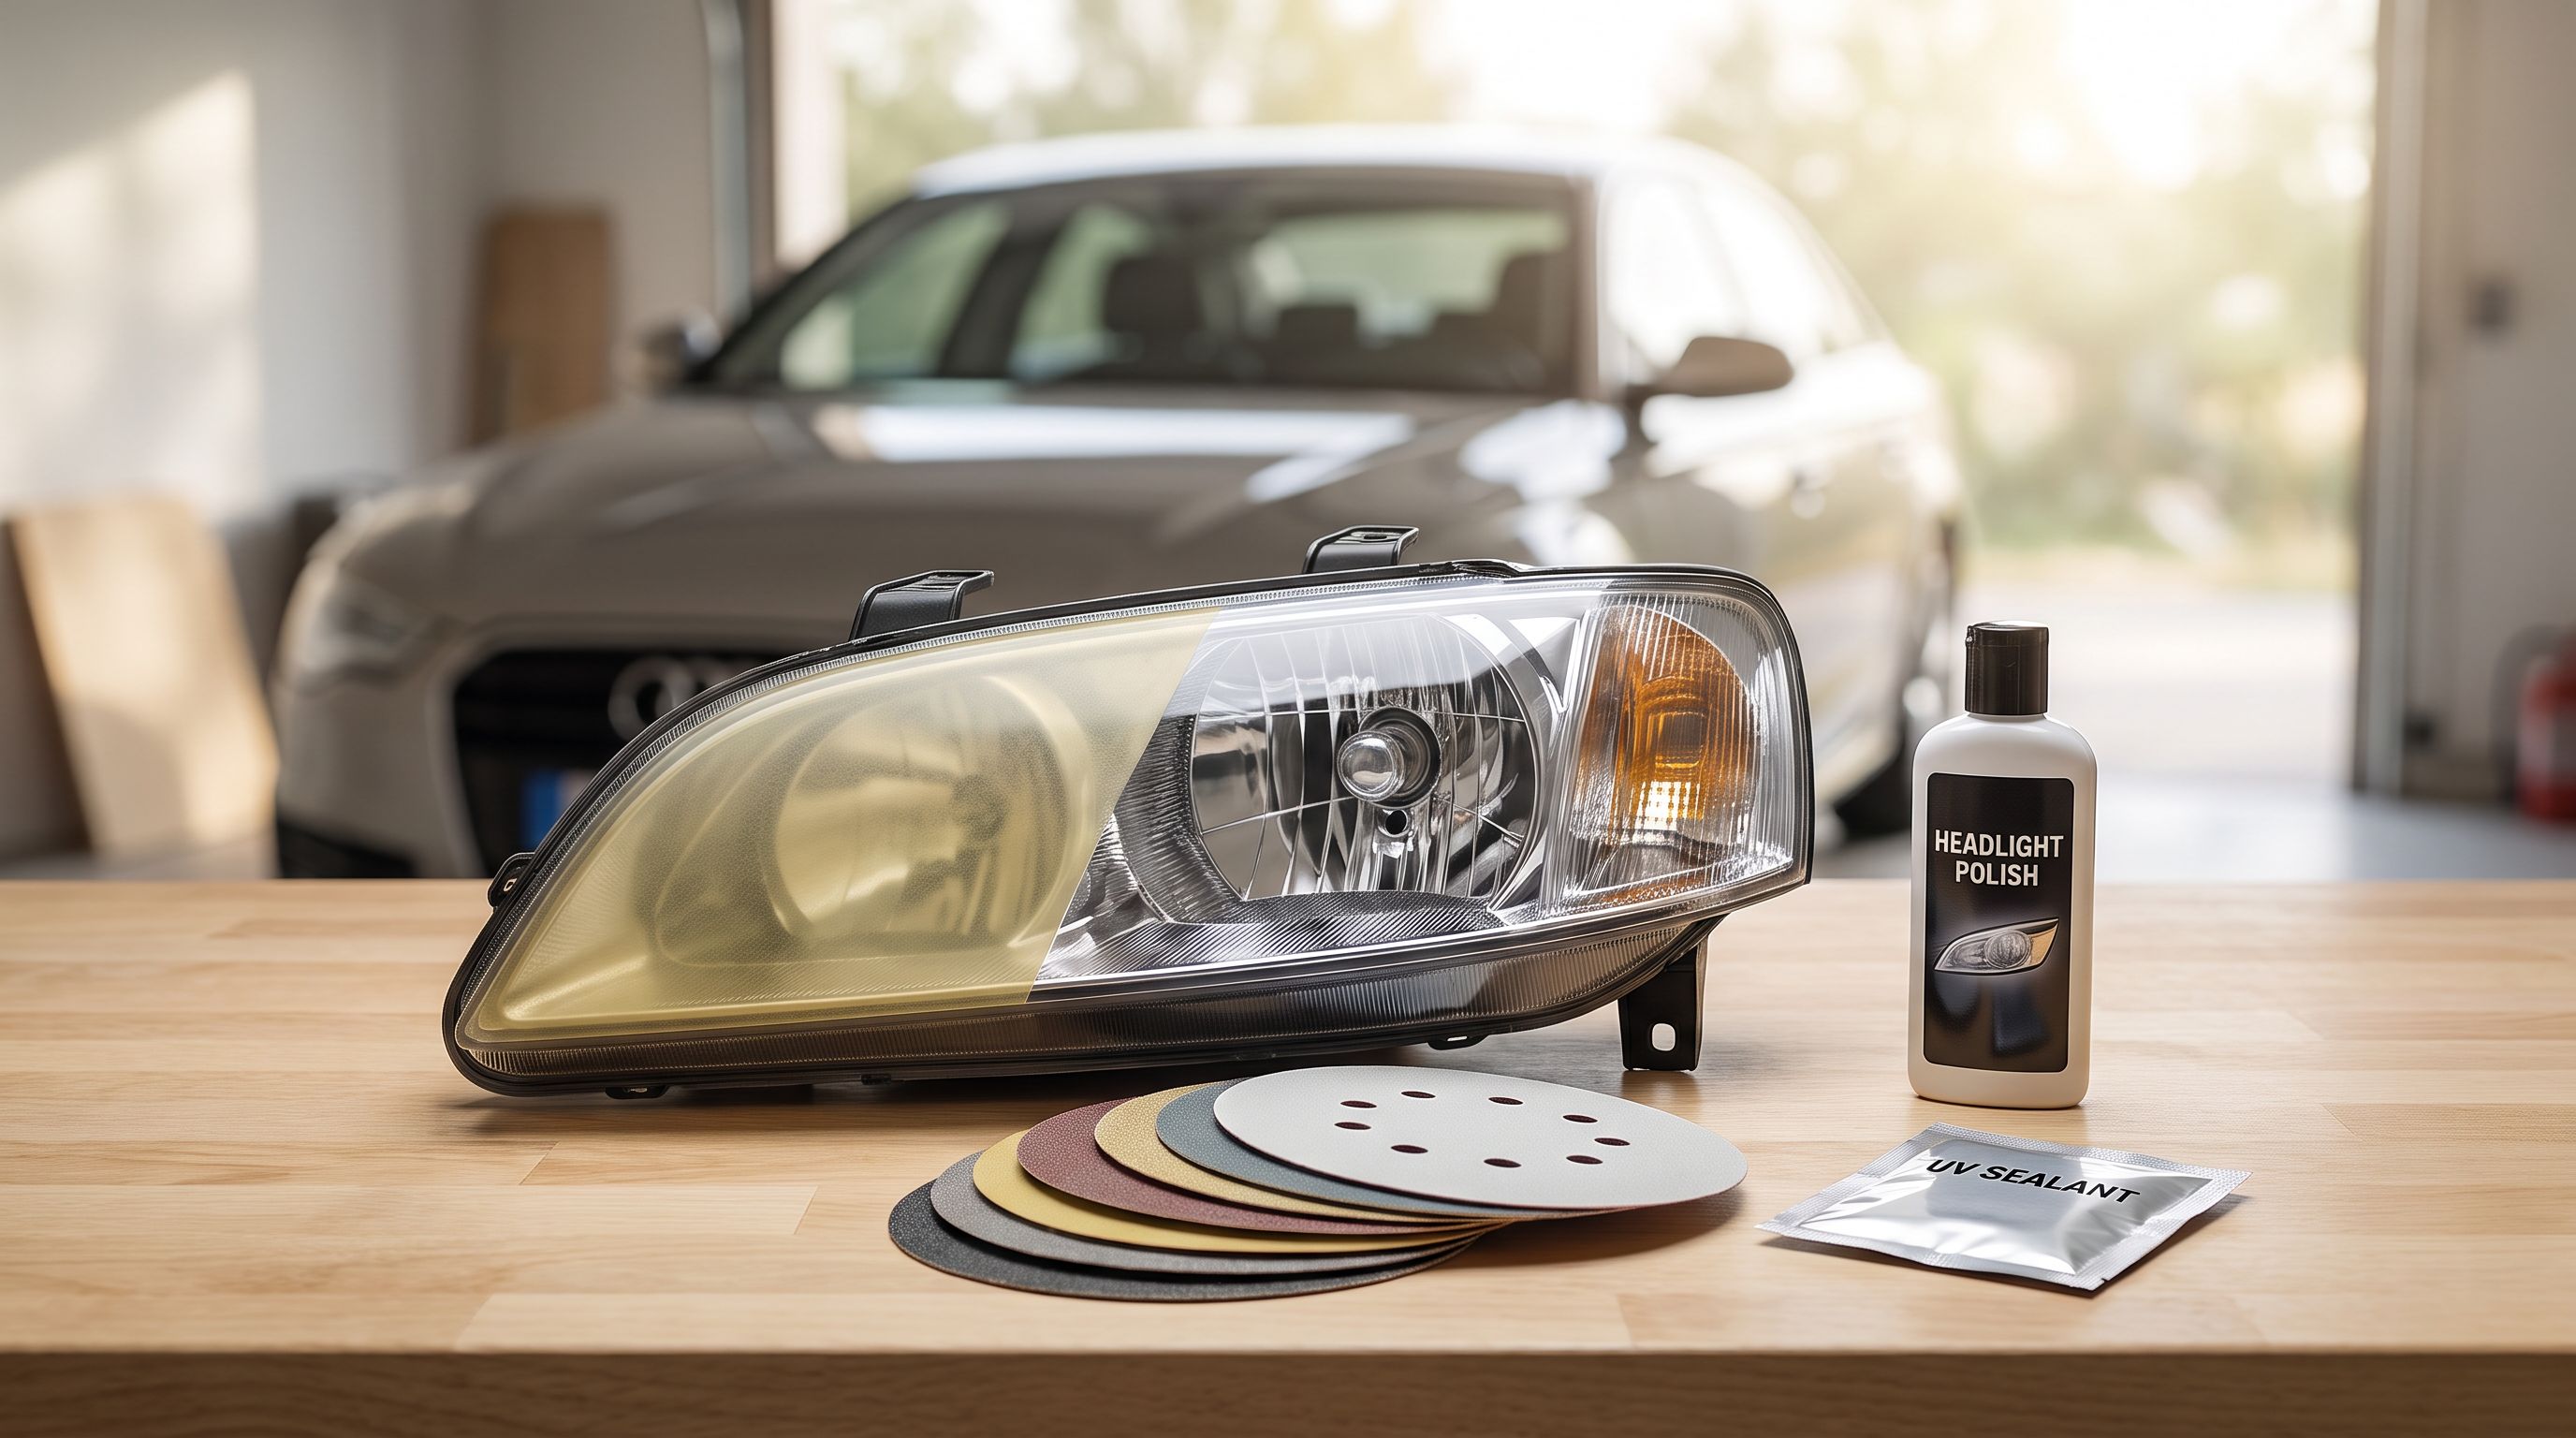
Headlight lenses are polycarbonate, not glass. From the factory they ship with a thin, hard UV-blocking clearcoat sprayed on the outside. That coating is the only thing standing between the plastic and the sun — and once it fails (usually after five to ten years, faster in Arizona or Florida than in Seattle), the raw polycarbonate starts oxidizing and yellowing within weeks.
That single fact explains the whole category. Any restoration kit that sands and polishes is, by definition, removing whatever remains of the factory UV layer. If the kit doesn't put a new UV barrier back on, you've just exposed bare plastic to the sun. It'll look spectacular for a month or two, then haze faster than it did the first time.
So the real question in 2026 isn't "which kit polishes best." It's "what does this kit leave behind on the lens when you're done?"
The short version
- Best overall: Cerakote Ceramic Headlight Restoration Kit
- Best for heavy oxidation: 3M Headlight Lens Restoration System (39195)
- Best balance of cut and protection: Sylvania Headlight Restoration Kit
- Best for light to medium hazing: Meguiar's Heavy Duty Headlight Restoration Kit
- Budget touch-up pick: Chemical Guys Headlight Restorer and Protectant
 Budget touch-up pick · Chemical Guys Headlight Restorer and Protectant — Check price on Amazon →
 Best balance of cut and protection · Sylvania Headlight Restoration Kit — Check price on Amazon →
 Best for heavy oxidation · 3M Headlight Lens Restoration System (39195) — Check price on Amazon →
 Best overall · Cerakote Ceramic Headlight Restoration Kit — Check price on Amazon →
GarageProof compares products using manufacturer specifications, independent reviews, and verified owner feedback. We don't physically test units — what follows is a research-driven ranking, with the trade-offs stated plainly.
Why polish-only kits disappoint
A polish-only kit is an abrasive compound, a pad, and maybe a "protectant" that is really just a wax or silicone dressing. Wax has no meaningful UV-blocking capability on polycarbonate. It beads water and adds gloss, and it's gone after a handful of washes.
Owner feedback across forums and retailer reviews converges on the same timeline: polish-only restorations on a sun-facing lens look great for roughly one to four months, then the yellow fog returns. Cars parked in a garage or under cover stretch that out. Cars that sit outdoors nose-south in a hot climate are back to square one before the season turns.
Kits that include a genuine UV-blocking sealant — a wipe-on ceramic, a 2K-style clear, or a dedicated UV clear spray — typically hold clarity for a year or more, and some manufacturers publish multi-year claims. Those claims depend heavily on prep. A sealant applied over an under-sanded, still-oxidized lens will fail early no matter what's in the bottle.
The three protection tiers you'll see
Tier 1 — Wax or silicone "protectant." Cosmetic only. Treat these kits as maintenance polishes, not restorations.
Tier 2 — Wipe-on UV sealant or ceramic coating. Applied from a saturated wipe or small bottle. Cures in minutes to hours, forgiving to apply, and genuinely blocks UV. This is where most of the best modern kits sit.
Tier 3 — Sprayed 2K or aerosol UV clearcoat. The most durable option and the closest thing to a factory re-coat, but it demands masking, a dust-free area, and comfort with aerosols. Runs and orange peel are real risks and are much harder to fix than a botched wipe-on.
Comparison at a glance
| Kit | Protection type | Power tool needed? | Best for | Main trade-off |
|---|---|---|---|---|
| Cerakote Ceramic Headlight Restoration Kit | Ceramic UV coating (wipe-on) | No | Moderate oxidation, long-term clarity | Limited cutting power on severely pitted lenses |
| 3M Headlight Lens Restoration System (39195) | Included protective/sealing step | Yes — corded or cordless drill | Severe yellowing, deep oxidation | Most labor; protection step is the least durable part |
| Sylvania Headlight Restoration Kit | UV-block clearcoat wipe | No | All-round DIY restoration by hand | Hand sanding is slow on large truck lenses |
| Meguiar's Heavy Duty Headlight Restoration Kit | Polish-based, minimal UV barrier | Yes — drill | Light to medium haze, fast results | Needs a separate UV sealant to last |
| Chemical Guys Headlight Restorer and Protectant | Polish with protectant | No | Early-stage cloudiness, maintenance | Not a true restoration; repeat often |
The picks
Cerakote Ceramic Headlight Restoration Kit — best overall
Prices last checked October 9, 2026. Amazon prices change frequently, so treat these as a guide and check the live price before you buy.
Cerakote Ceramic Headlight Restoration Kit
Wipe-on ceramic UV coating with no power tools needed — the longest-lasting protection of the wipe-style kits.
This is the kit that most directly answers the UV problem. Instead of finishing with a polish, the final step lays down a ceramic UV coating from a saturated wipe, and it cures in sunlight rather than needing a heat gun or spray booth. No drill, no polisher, no compounds flung across your fender. Reviewers and owners consistently report clarity holding well past the point where polish-only results have gone yellow, and multiple 2026 roundups name it best overall.
What it gives up: raw cutting power. The abrasive wipes handle typical oxidation and light yellowing well, but lenses that are deeply pitted, crazed, or sandblasted from highway miles may need separate wet sanding before the kit's chemistry can do its job. Work in shade, follow the cure instructions, and don't rush the final wipe — streaks lock in once cured.
3M Headlight Lens Restoration System (39195) — best for heavy oxidation
3M Headlight Lens Restoration System (39195)
Full drill-driven sanding progression that cuts through deep yellowing other kits can't touch.
When a lens has gone opaque brown and you can barely see the bulb through it, you need real abrasive progression, and this is the kit that provides it. It uses a drill-mounted backing plate stepping through coarse to fine discs, then a compound and polishing pad. The mechanical cut is far more aggressive than any hand-wipe system, which is exactly what badly degraded truck and SUV lenses require.
The trade-offs are honest ones. It's the most labor-intensive kit here, you need a drill and the patience to keep it moving, and the long-term protection step is the weakest link in the system relative to a dedicated ceramic. Many experienced users pair the 3M sanding progression with a separate UV clear or ceramic topcoat — a combination that beats either product alone.
Sylvania Headlight Restoration Kit — best balance of cut and protection
Sylvania Headlight Restoration Kit
Three-stage sand, clarify, and UV-block sealant in one box — hand-applied, no drill required.
Sylvania's kit is a genuine three-stage system: surface activator, hand-sanding progression with wet sanding, clarifying compound, and a UV-block clearcoat applied from a sealed wipe. Several 2026 roundups single it out for longevity, and that's down to the final coat rather than anything exotic in the abrasives. It's the kit to pick if you want real sanding capability without owning a drill.
The compromise is effort. Hand sanding two large pickup lenses is a workout, and it's easy to under-sand the perimeter where the lens curves — the exact spot where haze reappears first. Take the extra ten minutes on each lens. Also, the clearcoat wipe is single-use: open it only when the lens is fully dry and you're ready to commit.
Meguiar's Heavy Duty Headlight Restoration Kit — best for light to medium hazing
Meguiar's drill-driven kit is the fastest route from "cloudy" to "clear" for lenses that haven't gone fully brown. The included pad and compound cut quickly and finish with impressive gloss, and anyone who already owns a cordless drill will have both headlights looking new in well under an hour. Car Talk's roundup ranks the Meguiar's system as its best overall on results alone, and that's fair — the clarity is excellent.
The catch is durability. Protection here is polish-based, not a dedicated UV clearcoat, so plan on buying a separate UV sealant or ceramic coating and applying it the same afternoon. Without that step, expect the haze to creep back within a few months on an outdoor-parked car in a sunny climate.
Chemical Guys Headlight Restorer and Protectant — budget touch-up pick
Chemical Guys Headlight Restorer and Protectant
A one-bottle maintenance polish for mildly cloudy lenses that haven't fully oxidized yet.
This one isn't a restoration system and shouldn't be bought as one. It's a single-bottle polish with a protectant, aimed at lenses that are slightly cloudy, slightly dull, or starting to lose pop — not at ones that have turned yellow. Applied by hand or with a foam pad, it cleans up early oxidation and adds gloss in minutes.
Use it as maintenance between real restorations, as a quick refresh before selling a car, or on a newer vehicle whose factory coating is still mostly intact. Expect to reapply seasonally. If the lens already looks amber in daylight, skip this and go to one of the sanding kits above — no polish-only product will fix a failed clearcoat.
How to choose
Match the kit's cut to the damage, not to the price
Stand three feet away in daylight. If the lens is faintly cloudy with good light output, a polish-grade product is enough. If it's visibly yellow or amber, you need a wet-sanding progression. If you can see flaking, crazing, or a patchy "alligator skin" texture, that's the old factory clearcoat delaminating — it must be fully sanded off, which means a drill-based kit like the 3M system or significant hand sanding.
Confirm there's a real UV step, and know what it is
Read the box or listing for the final stage. Words like "ceramic coating," "UV-block clearcoat," or "2K clear" indicate real protection. Words like "protectant," "sealant wax," or "shine enhancer" usually don't. If the kit you want has great abrasives but a weak final step, buy a standalone UV clear or ceramic headlight coating separately — this is the single highest-value upgrade in the whole category.
Decide how much tool work you're willing to do
Drill-based kits are faster and cut harder but throw slurry, can burn the plastic if you dwell in one spot, and require a steady hand near paint. Wipe-and-hand kits are slower and gentler, with far less risk of damage. Neither is wrong — but buying a drill kit when you don't own a drill, or a hand kit for two badly cooked F-150 lenses, is how people end up disappointed.
Factor in your climate and parking situation
A garaged commuter in the Pacific Northwest can get years out of a modest kit. A truck that lives outdoors in Phoenix will punish anything short of a ceramic or sprayed clear. Be realistic about your conditions before judging a product's longevity claims.
Check the lens material and any existing film
Most modern headlights are polycarbonate, but a few vehicles use glass lenses that never yellow and should never be sanded. Some owners also run clear paint-protection film over the lenses; sanding straight into PPF makes a mess. Confirm what you're working with — and if your vehicle has a factory or dealer-applied lens film, remove it before restoring.
Application tips that matter more than brand
- Mask aggressively. Two layers of painter's tape around the lens perimeter. Sanding slurry and compound will dull adjacent paint.
- Keep sandpaper wet. Dry sanding polycarbonate loads the paper and leaves deep scratches you'll fight for an hour.
- Sand in alternating directions. Each finer grit should run perpendicular to the last so you can see when the previous scratches are gone.
- Degrease before coating. Isopropyl alcohol wipe, then let it flash off completely. Any compound residue under a UV coating causes early failure.
- Work out of direct sun. Most coatings flash too fast on a hot lens, which causes streaking.
- Don't skip the back side. If the inside of the lens is hazy or there's moisture in the housing, no amount of outside work will fix the output — that's a seal or vent issue.
FAQ
How long does a headlight restoration actually last? Polish-only results typically hold a few months on a sun-exposed car. Kits finishing with a true UV clearcoat or ceramic coating commonly hold a year or more, and sprayed 2K clears can go longer. Prep quality and parking location matter as much as the product.
Can I just use toothpaste or bug spray? Toothpaste is a mild abrasive and will shine up a lens briefly, but it removes nothing meaningful and offers zero UV protection. Insect repellent containing DEET softens polycarbonate — it looks clear for a day and accelerates the damage. Don't.
Do I need a drill? Only if the oxidation is heavy. Wipe-based kits like the Cerakote system and hand-sanding kits like the Sylvania kit handle typical yellowing without one. For severely degraded lenses, a drill-driven system such as the 3M 39195 saves significant time and does a better job.
Will restoration improve my headlight output? Yes, often dramatically. A yellowed lens scatters and absorbs light, reducing usable beam distance and ruining the beam pattern's cutoff. Clearing the lens restores both brightness and pattern — frequently a bigger safety gain than swapping bulbs.
Can I apply a ceramic coating over a kit that didn't include one? Absolutely, and it's one of the smartest moves in this category. Finish the kit's polishing stage, wipe the lens with isopropyl alcohol, let it dry fully, then apply a dedicated headlight UV ceramic. That combination is what turns a three-month result into a multi-year one.
Is restoration always better than replacing the housing? Not always. If the lens is cracked, internally fogged, or the housing seal has failed and holds water, replacement is the correct fix. Restoration only addresses exterior surface oxidation.
Our picks

Meguiar's Heavy Duty Headlight Restoration Kit
Drill-powered pad and compound that restores clarity fast, though protection is the weak link.
Get the best car care deals in your inbox
Join the GarageProof newsletter for hand-picked car care deals and new buying guides. No spam, unsubscribe anytime.
Related reads
Paint Correction Clear Coat Thickness in 2026: When to Stop
How to read a paint depth gauge, budget clear coat microns, and know when to stop polishing — plus the best paint thickness gauges and compounds for 2026.
Clay Bar vs Clay Mitt in 2026: Which Marrs Paint Less?
Clay bar vs clay mitt in 2026: how grade, lube and clearcoat hardness affect marring, plus four decontamination picks for soft and hard paint.
Undercoating Spray for Cars in 2026: Match It to Your Climate
Wax, lanolin-oil or rubberized? Compare undercoating spray for cars on durability, reapplication intervals and salt-belt owner feedback — plus picks for rusty frames.